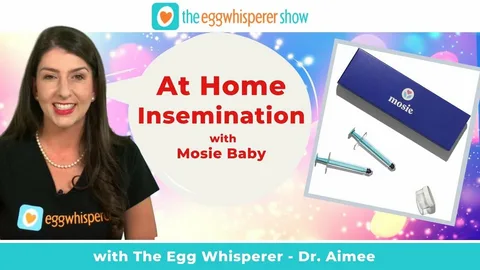
Fertility journeys are deeply personal, often filled with a mix of hope, anxiety, and logistical challenges. For many individuals and couples, the path to conception involves clinical appointments, timed schedules, and a significant emotional investment. In recent years, a transformative option has emerged that places control back into your hands: the at home IUI kit. This innovation is not about replacing medical expertise but about supplementing it with convenience and comfort. Understanding how this method works requires a shift in perspective from traditional clinical settings to the familiar environment of your own living space. The core promise of an at home IUI kit is accessibility, yet many remain unaware of the specific, life-changing advantages it offers beyond mere convenience.
The process of intrauterine insemination (IUI) has long been a cornerstone of fertility treatment in clinics. However, the adaptation of this procedure for home use represents a significant leap in reproductive autonomy. When you consider the standard clinic-based IUI, you often encounter scheduling conflicts, travel time, and the sterile atmosphere of a doctor’s office. An at home IUI kit directly addresses these friction points by providing sterile components, clear instructions, and the technology needed to perform the insemination without clinical oversight, assuming no underlying medical complications. This is not a do-it-yourself project for everyone, but for those with confirmed fertility health—such as women with open fallopian tubes and men with adequate sperm counts—it opens a door to a less stressful conception experience.
What makes the modern at home IUI kit stand out is its sophisticated design, which goes far beyond simple artificial insemination tools used decades ago. These kits now include specialized catheters designed to bypass the cervical canal, cervical mucus, and deposit washed sperm directly into the uterus. This is a critical distinction from vaginal insemination or cervical cap methods, which have lower success rates per cycle. The science behind the at home IUI kit relies on the same biological principle as clinical IUI: placing a higher concentration of motile sperm closer to the fallopian tubes, thereby reducing the distance sperm must travel and increasing the likelihood of fertilization. For couples dealing with mild male factor infertility, cervical mucus hostility, or unexplained infertility, this targeted approach can be a game-changer.
Understanding the Core Mechanics of Home Insemination
To truly appreciate the value of an at home IUI kit, one must first understand the biological barriers it overcomes. Natural conception requires sperm to swim through the vagina, across the cervix, through the uterine cavity, and finally into the fallopian tubes. This journey is fraught with obstacles, including acidic vaginal pH, thick cervical mucus that may be hostile to sperm, and the sheer physical distance. Traditional at-home insemination methods, such as using a needleless syringe for vaginal deposition, only place sperm at the entrance of the cervix. While better than nothing, this still leaves a long trek for sperm. In contrast, the at home IUI kit includes a longer, thinner catheter that gently passes through the cervical opening, depositing a concentrated sample directly into the uterine cavity.
This process, known as intrauterine insemination, bypasses the cervix entirely. For women who have undergone procedures that affected cervical mucus production or those with antibodies that attack sperm in the cervix, this is a monumental advantage. The at home IUI kit typically comes with sterile, single-use catheters that are flexible and designed to be atraumatic. Many users worry about pain or difficulty, but with proper instruction and anatomical familiarity, the procedure is often described as mildly uncomfortable rather than painful. The kit also includes specimen collection cups, often with non-spermicidal lubricant, and transfer devices. The key to success with any at home IUI kit lies in timing. Most kits are used in conjunction with ovulation predictor kits (OPKs) to pinpoint the fertile window, ideally performing the insemination within 12 to 36 hours after the luteinizing hormone (LH) surge.
A common misconception is that these kits work best with fresh samples only. While fresh is certainly viable, many advanced at home IUI kit options now accommodate washed or unwashed samples. Sperm washing is a process that removes seminal fluid, prostaglandins, and non-motile cells, which can cause uterine cramping. Some home kits include components for a simplified washing process using density gradient or simple centrifugation alternatives, though this requires additional equipment. For most users, the standard at home IUI kit is designed for use with fresh samples collected on the day of the procedure. The sample should be allowed to liquefy for 15 to 30 minutes at room temperature before being drawn into the catheter. This attention to detail mirrors clinical protocols and significantly impacts outcomes.
The Privacy and Emotional Comfort Factor
One of the most cited reasons for switching to an at home IUI kit is the profound sense of privacy it restores to the conception process. In a clinical setting, you may be on a strict schedule dictated by the clinic’s availability, sometimes requiring you to take time off work, arrange childcare, or rush through a lunch break. There is little room for spontaneity or emotional connection with your partner. The examination room is cold, the lighting is harsh, and the presence of medical staff, no matter how kind, changes the dynamic of what should be an intimate moment. With an at home IUI kit, you reclaim that intimacy. You can choose the time of day, the ambiance, and the support system around you. For many couples, this reduction in environmental stress directly correlates with improved hormonal balance and, ultimately, better outcomes.
Stress is a well-documented inhibitor of fertility. Cortisol, the primary stress hormone, can disrupt the hypothalamic-pituitary-ovarian axis, leading to irregular cycles, anovulation, or luteal phase defects. The clinical environment, for all its benefits, is a known stressor. The at home IUI kit eliminates travel anxiety, waiting room nerves, and the feeling of being observed. You can perform the insemination in your bedroom, with your partner, using your own pillows and your own music. This sense of safety and relaxation triggers the parasympathetic nervous system, which is essential for reproductive functions. Furthermore, the financial aspect cannot be ignored—while not a primary emotional factor, the lower cost per cycle reduces the financial pressure that often accompanies fertility treatments, allowing couples to try more cycles without the burden of crippling debt.
For single mothers by choice or LGBTQ+ couples using donor sperm, the at home IUI kit offers a level of discretion and control that is otherwise hard to find. You are not required to explain your family structure to a series of nurses or billing departments. You can order the kit online, receive it in discreet packaging, and perform the procedure in the privacy of your home. This autonomy extends to the timing of insemination relative to your cycle. Instead of calling a clinic on the day of your LH surge and hoping they have an opening, you simply prepare the at home IUI kit and proceed. This immediacy is crucial because the fertile window is only about six days long, with the two days before ovulation offering the highest probability of conception. Delaying by even 12 hours for a clinic appointment could mean missing the window entirely.
Step-by-Step Usage and Best Practices
Success with an at home IUI kit hinges on meticulous preparation and execution. The first step is always confirmation of ovulation. Using a digital or strip-based ovulation predictor kit, you should test daily, sometimes twice a day, around your expected fertile window. Once a positive LH test is detected, ovulation is likely to occur within 24 to 48 hours. This is your signal to prepare your at home IUI kit. Begin by washing your hands thoroughly with soap and warm water. Set up a clean surface, such as a paper towel on a bathroom counter or bedside table. Remove all components from the packaging: the specimen cup, the sterile catheter, the plunger or syringe, and any included lubricant or alcohol wipes. It is vital to avoid touching the tip of the catheter or the inside of the specimen cup to prevent contamination.
Your partner, or the sperm source, should now collect a fresh sample into the provided specimen cup. This is typically done via masturbation. For best results with an at home IUI kit, the sample should be collected after a short abstinence period of two to three days, which optimizes sperm count and motility. Once collected, place the lid on the cup and let it sit at room temperature for 15 to 30 minutes to allow the semen to liquefy. During this time, you can prepare your body. Some users find that emptying the bladder and gently cleansing the external genital area without any scented soaps is beneficial. You may also want to lie down with a pillow under your hips to tilt the pelvis slightly, which theoretically straightens the uterine angle, though this is not strictly necessary for all anatomies.
After liquefaction, you will draw the sample into the syringe or catheter loader included in your at home IUI kit. Most kits feature a blunt-tip catheter designed to minimize trauma. Gently insert the catheter into the vagina, guiding it toward the cervix. You can locate the cervix by feeling for a firm, donut-shaped structure at the back of the vaginal canal. Slowly and gently advance the catheter until it passes through the cervical opening, which may feel like a slight give or pop. Never force the catheter; if you meet resistance, adjust the angle slightly. Once the catheter is in the uterine cavity, depress the plunger to deposit the sample slowly over about 10 seconds. Withdraw the catheter gently, then remain lying down with your hips elevated for 15 to 30 minutes. This rest period allows the sperm to disperse and reduces the chance of immediate backflow.
Expert Insights on Timing and Cycle Synchronization
Fertility experts emphasize that the at home IUI kit is not a magical solution but a tool that works best when integrated with a deep understanding of your menstrual cycle. The luteinizing hormone surge is the most reliable predictor of impending ovulation, but it is not the only one. Monitoring basal body temperature (BBT) can confirm that ovulation has occurred, but it is a retrospective tool, not a predictive one. For IUI, you need to inseminate before ovulation so that sperm are waiting in the fallopian tubes when the egg is released. Therefore, using the at home IUI kit on the day of the positive LH test is generally recommended, with a possible second insemination 24 hours later if your kit includes multiple catheters or if you purchase two kits for a single cycle.
One common mistake is performing the IUI too early or too late. If you inseminate three or more days before ovulation, the sperm may be aged and less effective. If you inseminate more than 12 hours after ovulation, the egg may no longer be viable, as the egg survives only about 12 to 24 hours after release. The optimal window for using an at home IUI kit is the 24-hour period immediately following the LH surge. For women with irregular cycles, it may be wise to use fertility tracking devices that measure estrogen and LH, providing a longer warning window. Additionally, the age of the female partner is a critical factor. Women under 35 have the highest success rates per cycle with IUI, while those over 40 may see diminished returns, though the at home IUI kit remains a low-risk, low-cost option to try for several cycles before considering more invasive treatments.
Another expert insight involves the use of ovulation induction medications, such as Clomid or letrozole, in conjunction with the at home IUI kit. For women with polycystic ovary syndrome (PCOS) or ovulatory dysfunction, these medications can stimulate the development of one or more follicles. However, this should only be done under the guidance of a physician, as there is a risk of ovarian hyperstimulation syndrome (OHSS) or multiple pregnancies. If you are using fertility drugs, your doctor may still permit the use of an at home IUI kit for the insemination step, provided you are monitoring your cycle with ultrasounds or blood tests. This hybrid approach—medical ovulation induction plus home insemination—offers the best of both worlds: regulated cycle control without the need for clinical insemination.
Comparing Home IUI to Clinical IUI and Other Methods
When deciding whether an at home IUI kit is right for you, it is essential to compare it directly to clinical IUI and other home insemination methods. Clinical IUI typically costs between $300 and $1,000 per cycle, not including the cost of sperm washing, ultrasounds, or bloodwork. In contrast, a high-quality at home IUI kit ranges from $70 to $200 per cycle, with some kits including multiple catheters for back-to-back inseminations. The success rates per cycle for clinical IUI are often quoted between 10% and 20% for women under 35, depending on the underlying diagnosis. Home IUI success rates are slightly lower, generally between 8% and 15% per cycle, largely due to the lack of sperm washing and the inability to confirm catheter placement via ultrasound. However, when performed correctly over multiple cycles, the cumulative success rate of an at home IUI kit can approach that of clinical IUI.
Compared to the traditional at-home vaginal insemination using a simple syringe, the at home IUI kit is vastly superior. Vaginal insemination deposits sperm at the external cervical os, requiring sperm to navigate the entire cervical canal. Studies suggest that only about 1% of sperm deposited vaginally ever reach the fallopian tubes. In contrast, IUI places millions of sperm directly into the uterine cavity, bypassing the cervix entirely. This is particularly beneficial for couples using donor sperm that may have been frozen and thawed, as frozen sperm has reduced motility and lifespan. The at home IUI kit also reduces the risk of infection because all components are sterile and single-use, whereas reusing syringes or catheters can introduce bacteria into the uterus, leading to pelvic inflammatory disease—a rare but serious risk.
Another point of comparison is the emotional and physical toll of each method. Clinical IUI often requires transvaginal ultrasounds to measure follicle size and blood draws to confirm hormone levels. These procedures are invasive and can be painful for some women. The at home IUI kit requires none of that. You rely on your own tracking methods, which may be less precise but are certainly less invasive. For women with a history of sexual trauma or medical anxiety, the clinical setting can be re-traumatizing. Performing the insemination at home, with full control over every aspect of the procedure, can be a healing and empowering experience. The only clear advantage of clinical IUI is the ability to perform sperm washing, which removes prostaglandins that cause cramping, and the use of a speculum to visualize the cervix, ensuring precise placement.
Realistic Success Rates and What to Expect
Managing expectations is crucial when using any fertility method, and the at home IUI kit is no exception. It is important to understand that even under perfect conditions, the maximum per-cycle pregnancy rate for any form of IUI is around 25% for women under 35 with no fertility issues. For women aged 35 to 40, the rate drops to about 10% to 15%. Over 40, clinical IUI is often not recommended due to low success rates, and the same applies to home IUI. The at home IUI kit works best for couples with unexplained infertility, mild male factor (sperm count above 10 million per milliliter), cervical factor infertility, or for single women using donor sperm. It is not recommended for women with blocked fallopian tubes, severe endometriosis, or severe male factor where sperm count is below one million per milliliter.
The first cycle with an at home IUI kit is often a learning curve. Many users do not succeed on the first attempt, and that is completely normal. Fertility experts advise committing to at least three to four cycles before concluding that the method does not work for you. This is based on the principle of cumulative pregnancy rates: if the per-cycle success rate is 10%, the chance of conceiving within three cycles is about 27%, and within six cycles, about 47%. Therefore, patience is not just a virtue but a statistical necessity. After each insemination, you will wait for approximately 14 days to take a pregnancy test. During this two-week wait, it is best to avoid testing too early to prevent false negatives or false positives from the hCG trigger shot if you used one.
What should you do if you experience failure with the at home IUI kit after several cycles? First, re-evaluate your technique. Are you correctly identifying ovulation? Are you allowing the sample to liquefy fully? Are you inserting the catheter to the correct depth? Second, consider whether there may be an undiagnosed fertility issue. If you have not had a recent fertility workup, it may be time to visit a reproductive endocrinologist for a semen analysis, hysterosalpingogram (HSG) to check tube patency, and ovarian reserve testing. The at home IUI kit is a wonderful tool for the right candidate, but it is not a substitute for medical diagnosis. If these tests reveal no issues, you may simply need more cycles. Many success stories come from couples who persisted through five or six home IUI attempts before achieving a positive result.
Common Mistakes and How to Avoid Them
Even the most well-designed at home IUI kit can fail if certain common mistakes are made. The number one error is improper timing. Some users rely on calendar-based predictions rather than ovulation tests, leading to insemination days before the LH surge or after ovulation has already passed. Always use a high-quality OPK, and test twice a day as you approach your fertile window. The second most common mistake is not allowing the semen to liquefy. Freshly ejaculated semen is gel-like; if you draw it up immediately, it will not flow through the thin catheter. It clogs the device, leading to frustration and wasted sample. Always let the sample sit for at least 15 minutes at room temperature. Swirling the cup gently a few times can help speed up the process.
Another frequent error is introducing air bubbles into the uterus. When you draw the sample into the syringe or catheter system of your at home IUI kit, be careful to expel any air before insertion. Air injected into the uterine cavity can cause discomfort, cramping, and potentially reduce implantation rates by creating turbulence. To avoid this, draw the sample slowly, tap the syringe to bring bubbles to the top, and gently push the plunger until a tiny drop forms at the tip of the catheter. Then, and only then, proceed with insertion. Additionally, many users make the mistake of not using enough sterile lubricant on the catheter. While the catheter is designed to be smooth, the vaginal walls can be dry, especially if you are anxious. Use the non-spermicidal lubricant provided or a fertility-friendly lubricant to ease insertion without harming sperm.
Failing to maintain sterility is a serious but preventable mistake. The at home IUI kit comes with sterile components that are sealed. Do not open the catheter packaging until you are ready to use it. Do not set the catheter down on an unsterile surface, such as a bedsheet or towel, and then reinsert it. If you drop the catheter or touch the tip, discard it. Some kits come with one spare catheter for this reason, but if not, you may need to stop the procedure and order a new kit, which is frustrating but necessary to prevent infection. Uterine infections, while rare, are serious and can cause long-term fertility damage. Finally, a psychological mistake is giving up after one or two failed cycles without adjusting your approach. Keep a detailed log of your cycle days, LH surge times, insemination times, and any symptoms. This data will help you refine your process with each subsequent use of the at home IUI kit.
FAQ Section
1. Is an at home IUI kit as effective as a clinical IUI?
The effectiveness of an at home IUI kit is generally slightly lower than clinical IUI, primarily because clinics can perform sperm washing to remove prostaglandins and debris, and they use a speculum to ensure the catheter passes through the cervix accurately. Clinical studies suggest home IUI success rates per cycle range from 8% to 15%, while clinical IUI ranges from 10% to 20% for women under 35. However, the cost per cycle is significantly lower with a home kit, allowing for more attempts. For couples with no major fertility barriers, the cumulative success rate over three to four cycles of home IUI often matches that of a single clinical IUI cycle when factoring in the reduced stress and convenience. The key is meticulous timing and proper technique. If you have a known cervical factor or need washed sperm for medical reasons, clinical IUI remains superior. Otherwise, the at home IUI kit is a highly effective alternative.
2. Can I use an at home IUI kit with frozen donor sperm?
Yes, you can use an at home IUI kit with frozen donor sperm, but there are important considerations. Frozen sperm has a shorter lifespan and lower motility after thawing compared to fresh sperm. You must time the insemination very close to ovulation, ideally within 12 hours of the LH surge. Most frozen sperm vials come from a sperm bank and are already washed, which is beneficial because it removes the need for home washing. However, you will need to thaw the vial according to the bank’s instructions, usually in a water bath at body temperature for 10 to 15 minutes. Once thawed, you can draw the sample directly into the at home IUI kit catheter. Be aware that the volume of a donor vial is often smaller than a fresh sample, so use a catheter designed for low volumes. Also, because frozen sperm is expensive, many users prefer to have a backup plan, such as performing a second insemination 24 hours later using a second vial, which doubles the cost but may improve odds.
3. Are there any medical risks associated with using an at home IUI kit?
When used correctly according to the instructions, an at home IUI kit carries low risks. The most common side effect is mild uterine cramping during or after the procedure, which usually resolves within a few minutes to an hour. This is caused by prostaglandins in the semen stimulating uterine contractions. Some kits contain components that reduce this risk, but it is generally harmless. A more serious but rare risk is infection, such as endometritis or pelvic inflammatory disease. This occurs if bacteria are introduced into the uterus via an unsterile catheter, fingers, or contaminated semen. To mitigate this, always wash your hands thoroughly, avoid touching the catheter tip, and never reuse any part of the at home IUI kit. Another theoretical risk is introducing an allergic reaction to components of the kit, though this is extremely rare. If you experience severe abdominal pain, fever, chills, or foul-smelling discharge after the procedure, seek medical attention immediately.
4. How do I know if I am a good candidate for an at home IUI kit?
You are a good candidate for an at home IUI kit if you have confirmed that your fallopian tubes are open (via an HSG or similar test), you ovulate regularly or can induce ovulation with medication under a doctor’s supervision, and the male partner has a sperm count of at least 10 million motile sperm per milliliter. Ideal candidates include couples with unexplained infertility, mild male factor, cervical mucus hostility, or sexual dysfunction that makes intercourse difficult. Single women using donor sperm and lesbian couples are also excellent candidates. You are NOT a good candidate if you have bilateral blocked tubes, severe endometriosis, uterine abnormalities like large fibroids or polyps, or severe male factor (count below 1 million). Additionally, women over 40 may have lower success rates, but the at home IUI kit can still be attempted if ovarian reserve is good. Always consult a reproductive specialist to rule out underlying conditions before investing time and money into home IUI.
5. What should I do if I experience severe cramping during the procedure?
Severe cramping during use of an at home IUI kit is not typical, but it can happen. First, stop immediately if you feel sharp pain. Do not force the catheter further. Remove it gently. Severe cramping often indicates that the catheter has been inserted too aggressively, has touched the uterine fundus (the top of the uterus), or that you are experiencing a vasovagal response, which is a sudden drop in heart rate and blood pressure due to cervical stimulation. If you feel faint, lie down with your feet elevated. Most cramping will subside within a few minutes. To prevent this in the future, ensure you are using a flexible, rounded-tip catheter designed specifically for an at home IUI kit. Do not push if you meet resistance; instead, change your pelvic angle by tilting your hips or using a slight rocking motion. Some users find that taking ibuprofen one hour before the procedure reduces cramping, though it is best to consult your doctor first. If cramping persists for more than an hour or is accompanied by heavy bleeding, contact a healthcare provider.


Leave a Reply